Plan B, I saw an ad on Craigslist for a 14' galvanized trailer at a good price. I bought it from a fellow who raises bees. I asked him if he ever got stung and he said "hell yes, constantly". I told him I really appreciate his sacrifice so I can enjoy my Honey Nut Cheerios. He even gave me a free bottle of Tupelo Honey with the trailer. Sweet!
 | ||
| Trailer |
As you can see, it came with a boat and a trolling motor on it which I plan to sell as soon as I get it titled in my name. It was kind of funny because when I went to look at it the guy wanted to point out how great the features on the boat are. He couldn't understand why I didn't comment on the interior and kept looking at the bottom of the hull. I thought about keeping the trolling motor but it's a bow mount then Debbie started muttering to herself and giving me that look again. The trailer itself is galvanized but there are several parts on it that are not. As soon as I get the boat off of it I'll start refurbishing it. It was the right price even with what I'll have to put into it, especially if I can sell the boat for a decent price. It's a fiberglass boat and I thought about sanding it, filling in the blemishes and repainting it just for the practice before I get to that part on my boat. Should it not sell quickly I may still do that. If you know someone who lives on a river, a lake or has an empty trailer that they need a boat for let me know.
Well, I started sanding. The angle on the stringers on the decks are a compromise and work pretty good in the middle of the boat but as you work your way to the bow and stern the angle changes. I used the belt sander and a straight edge to make sure that when I put the sides on they will be flush up against the stringers. I didn't take a before and after picture so you will just have to take my word for it. I also worked on the edges on the rudder. The leading edge is rounded over a little and the trailing edge is sanded to a point.
 | ||
| Rudder Leading Edge |
 |
| Rudder Trailing Edge |
Then I smoothed out and rounded off the rudder box sides.
 |
| Rudder Assembly |
In between sanding I cut out the sides and the seats.
The sides are made from two 1/4" sheets of plywood and were pretty quick. I just cut each sheet in half and then cut out the angles.
 |
| Hull Sides 1 |
 |
| Hull Sides 2 |
Next I lofted two sheets of 1/4" plywood for the seats and seat backs. I did the same as before measuring out the station lines and using the nails and a stringer to loft the shapes.
 |
| Lofting the Seats |
 |
| Lofted Seats |
Then I cut them out. I'm getting to be an old pro at lofting and cutting the plywood pieces. Of course these are the last cuts I'll be making on plywood because the rest of the cuts from here on out will be cutting up sticks
 |
| Seats and Seat Backs |
 |
| Seats |
I also cut out the seat support pieces. I free-handed the front on one piece and then duplicated it on the rest. I'm more of a connect the dots sort of guy but I'm pretty pleased with how they came out. There is some ink writing stamped on one of them and it reminds me of Mr Spock.
 |
| Vulcan Seat Supports |
The plans call for searching at the dump for discarded windsurfer masts for spars - really, I'm not making that up. I haven't gone to the dump because it's dangerous fighting off all the other rednecks besides all the really good stuff is dropped on the side of a dirt road in the middle of the forest anyway. Also, a fellow could get shot if Bubba thinks the windsurfer mast I found is a fishing pole. Another good reason to avoid it is that the dump smells like a dump.
The windsurfer spars are very light weight and strong. I priced them out on the internet and even the used ones are pretty pricey plus the shipping is expensive as hell. The plans say as an alternative, you can use aluminum but they are too expensive as well. I needed to come up with a better (cheaper) alternative. I researched it and decided I can make my own spars. The video that came with the plans, which is for the next size up boat called the Weekender, show making spars out of a long 4" X 4". You just cut and sand it down to the shape and size you want. The Weekender is a little longer and heavier than the Skipjack because it has a cabin. I sent an email to the designer, Peter Stevenson, about getting the plans for the solid spars that the weekender uses. I thought it was a reasonable request because both boats use the same size sails. He responded that it wouldn't be a good idea to put that much weight aloft on a Skipjack since it is so much lighter than the Weekender. Foiled again!
I did some more research and came across a way to build hollow spars using the birdsmouth method. There are even some people who have used these type of spars on a Skipjack. Eureka! It's called "birdsmouth" because of the way that you cut the side of eight staves. They nest inside each other in a circular pattern to form a hollow mast that only weighs about 60% of what a solid mast would weigh. The best part is that the mast only looses a small percentage of it's strength. Evidently, the wood in the middle is just along for the ride.
To make the cuts you can use a table saw or it's even easier to use a router since they make birdsmouth bits. So I spent the money I would have spent on windsurfer masts to buy a router along with a table and a set of the special birdsmouth bits. The router will pay for itself eventually because I can use it to make a lot of different things. I bought some 1" X 2" X 8' wood that only cost $ 0.75 each and went at it. I loaded the bit into the router table and ran one piece through. After that I cut it up into approximately eight 1' lengths, nested them together using tape and rubber bands to hold everything together. When I make the actual spars I will glue all of the joints. The 45 degree angle at each joint give a large area for the glue to adhere to which makes for very strong joints. Here is the result.
 |
| Birdsmouth Test |
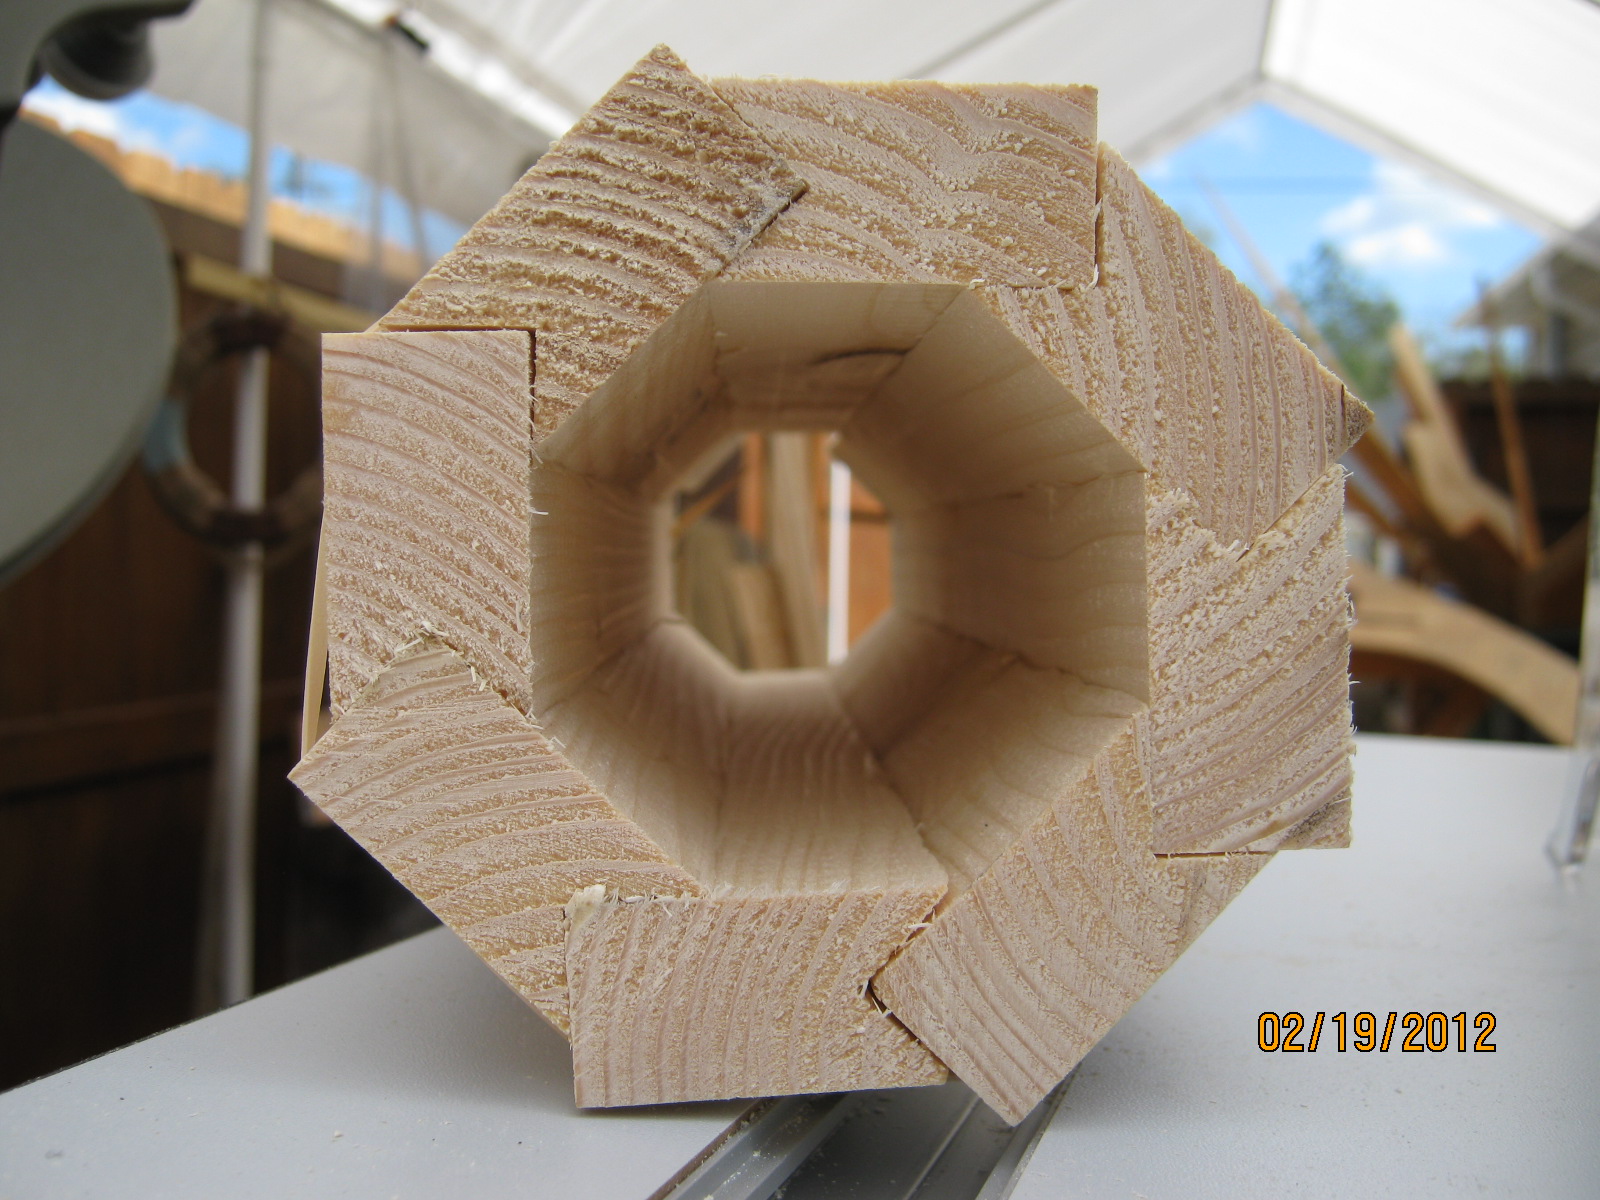 |
| Birdsmouth Test |
It was pretty simple and I really like the result. Not bad for my first time using a router table. When I make the spars I will sand off the excess to make the outside round. I'll place solid pieces of wood in the center to reinforce the ends and wherever I need to through-bolt attachment points. 1" X 2" staves are actually 3/4" X 1 1/2". This made the outside diameter 4" and the inside diameter about 2". That's bigger than I'll need. I'll use the router to get the actual size of the staves down to 1/2" X 1" which will give me a spar 2 1/2" thick. This may change a little as I work with some calculators I found on-line to determine the best wall thickness for my needs. Another good thing about making hollow spars is that I can run wiring or even the sheets up through the middle.