Sunday, November 13, 2011

And I don't even need the funky glasses!

I spent a little time doing a few odds and ends. First I made a little piece that fills up the space between the hull bottom and the keel. 


Dead Wood   


They call this piece "dead wood". I thought all the wood I'm using is dead wood because wouldn't "live wood" be called a tree? Anyway, I also cut a little notch for the front of the hull bottom to slide up into.

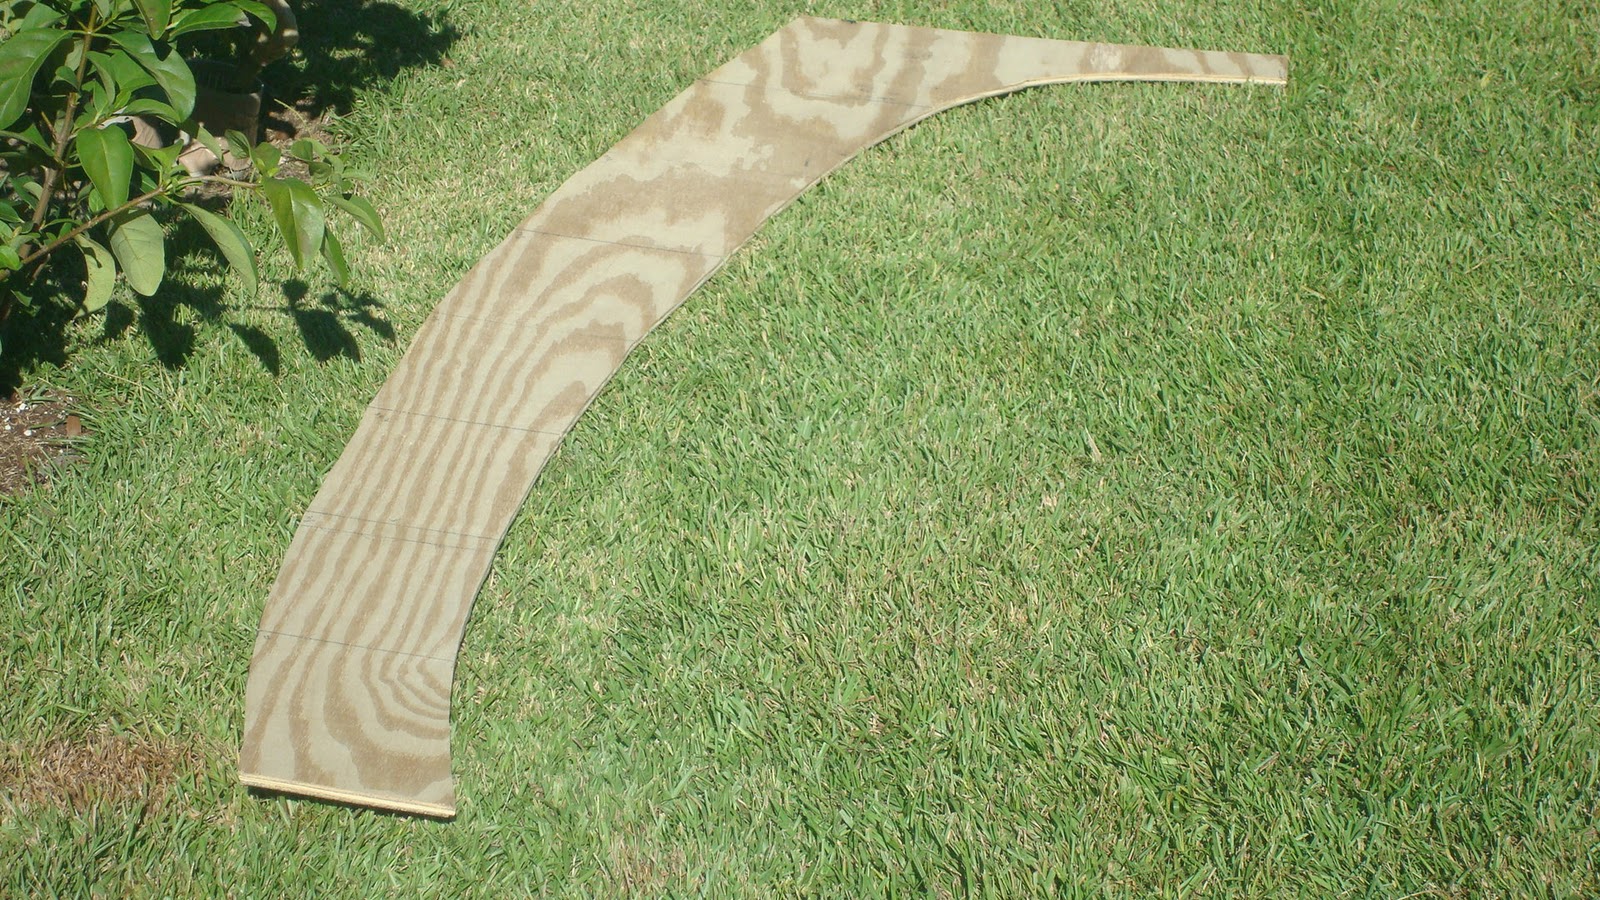
Then I made a stringer for the top of the transom. Because the top of the transom has quite a horizontal and vertical curve to it I kerfed the stringer on two sides. Kerfs are little cuts made halfway through the wood to allow it to bend.


Kerfed Stinger


I had noticed that the keel would developed a little bit of a bow to it when the humidity level got high. To help with this I sandwiched it between a couple of 2X8's and clamped everything together tightly to help keep the keel straight until I was ready to attach the hull bottom to it.


Clamped Keel


Next I started all of the screws that will be driven through the hull bottom into the top of the keel. I want to make sure that the keel doesn't move once the two pieces are attached so I doubled up on the number of screws.  I alternated them so that one screw goes into one side of the laminated keel and next screw goes into the other side.


Hull Bottom Screws


Ok, this is a big moment. I glued and screwed the hull bottom to the top of the keel. I went 3D baby!!!


3D!!


You can see that I made a stand that I attached to the tops of a couple of saw horses to hold the keel up high so I could make sure that everything was going together straight. If it had been on the ground I would have gotten dirt in my ear. 


While I had the epoxy out I glued together the five pieces of the deck. I flipped it over after I had everything glued up so that it wouldn't stick to the plastic I had under it. You can see the stringers and the panel joiners. Hopefully, this will be the only time the deck will be upside down.


Upside Down Deck  


Now that the boat is starting to go together, I needed to make a sled so that I can move it around easily. I used the stand I had made for the tops of the saw horses and some wheels I picked up at a garage sale. I'm so happy with it that I am thinking I'll just put a hitch on the front of it and use it as a boat trailer.


Boat Trailer


Finally, I put the deck on by attaching it to the transom, forward bulkhead and the stem. It's really starting to look like a boat now.


Front Deck Assembly


Rear Deck Assembly

Tuesday, October 11, 2011

No Idea How She Held The Saw!!


Now that I have the decks all cut out it's time to make the bulkheads. I made the transom first by measuring out my lines. The top is curved so I put nails at the top of each edge and one in the middle.


Transom Lofting


The curve was too severe for a batten so I clamped a flexible piece of metal to the nails.


Then I lofted the line and made the cuts. Here is what it ended up looking like.


Transom


Some boats don't even have a transom but it's pretty important on my boat. The rudder is attached to it and it's structural because it ties the ends of both decks and the side panels together. Not to mention it helps to keep the water on the outside of the boat. Three very important attributes.


Next came the forward bulkhead which has two access holes in it. The mast box will end up against the middle of it and I'll have a little covered stowage space between it and the bow.


Forward Bulkhead


And finally came the lazarette. It has one big hole in it which the tiller will pass through.


Lazarette


Here are all three of them lined up. It kind of surprised me how small the transom is compared to the bulkheads. I hope I measured it right! I checked the measurements at least five times before I cut it out and then I checked them again after I cut it out.


Vertical Pieces


I had been talking about needing to make some wheels to go on a frame that I will use to wheel the boat around once I start putting all of these parts together. Lacey must have been listening because the other day I came home and she was waiting out front for me with these.


Smart Ass Dog


You didn't here it from me, but she was tough to live with the rest of the day because she was quite proud of herself and acting kinda cocky.

Tuesday, October 4, 2011

This Is Where I Draw The Line(s)

After the keel, I lofted and cut out the hull bottom.


Hull Bottom Cutouts


Looks kind of small doesn't it? It gets bigger as the boat gets taller.

The way I loft the hull bottom is to draw a line down the center of the plywood. Then I mark perpendicular station lines every 10 1/2". I mark two points on each station line by measuring out a certain distance on each side of the center line. Then I put a nail at each point far enough in to just hold the nail in the wood. I use a batten that I ripped from 1 X 6 stock earlier and push it against the nails. Since I'm doing this by myself and I have to push hard to make some of the curves, I use clamps at every nail to hold the batten against them. Then I draw a line against the batten between each nail and when I remove the batten and nails it leaves the shape of the hull drawn on the plywood. I just cut along each line. The boat flairs out from the hull bottom 23 degrees on each side so I make the cuts with my saw set at a 23 degree angle. It's real easy to make a mistake by measuring the wrong distance or angling the cut the wrong way. I measure everything about four or five times and then I check all the measurements again. I stand there with the saw in my hand just looking at the wood for a couple of minutes before I start cutting. I didn't take any pictures of this process because I really had to concentrate on what I was doing and I happen to be chewing gum at the time. Here is a picture that is a little closer and if you look hard you can see the lines I drew on the wood.

Hull Bottom Lofting Lines

Now I need to attach the two pieces together and the battens to the edges. I start the screws into the wood the same way I did on the keel every three inches and a set distance in from the sides.

Hull Bottom Screws


I use a 1 X 4 to join the two pieces together and start the batten at the bow screwing and gluing as I go. Here is the finished product


Hull Bottom Glued and Screwed

Hull Bottom

It's actually upside down in these pictures because I screw the screws in from what will be the outside of the hull. This will be the only thing between me and the water. I sure hope I used enough glue!


Next I start on the top deck. I use the same process, drawing a reference line and station lines, measuring out the correct distance and angling all the outside cuts. It's a little different because I measure the two points out on the same side of the reference line. There are a total of five pieces for the deck. Here are pictures of each piece and how they fit together.

Deck Cutouts

That gets you all caught up to where I am today. I've been doing most all of the work on the weekends and I'm pretty happy with my progress over the last month. Each day I plan out what I want to get done but it usually takes much longer than I ever imagined to make each part. The routine is that I usually read through the plans a few times, watch the chapter of the video that has the part I'm building once or twice, then read along as I'm watching the video. I go outside and get everything ready and get started. I make about twenty trips to the shed to get the tools I need. I check my measurements and recheck them. Then I fix the ones I got wrong and check them a couple of more times. Maybe I go back inside to watch the video again. While I'm there I might as well make a sandwich and sit down to see what game is on tv while I eat. Then I get involved in the game and just have to watch until it's decided. Go back outside and figure out where I left off. Then go back inside to watch the video again because I forgot what I saw before eating lunch. Once I get all the pieces marked off and cut I'm ready to call it a day but I have to make another 20 trips to the shed to put the tools back up. What I think will be a two hour job ends up taking all day. But I'm having fun.


One day I decided that I wanted to sit in the rocker on the front porch and whittle so I got my knife out and went to town on that 2 X 4 that I'm using for my tiller handle.

Tiller

I still have a little more work to do on it but it fits my hand well.

Thursday, September 29, 2011

I Have a Stuck-Up Lizard

First cut fever has nothing on epoxy flu.


This is the first time I've ever used epoxy that didn't come out of a small tube. The plans just call for a water based glue but after looking on the message boards, epoxy is really the way to go. It's incredibly strong when it's correctly applied and cured. The wood will fail before the epoxy does. It can be used as a glue, coating, fairing compound and to apply the fiberglass. I mix hardener into the resin and apply this to the wood to protect it. I also use this mixture to wet out the fiberglass. I mix silica and wood flour into it to make glue. The silica keeps it from running and the wood flour thickens it up. I mix microballoons and wood flour into it to make a faring compound. The microballoons make it easy to sand to get a smooth finish. Besides, water based glue on a BOAT? They say that it's only water soluble until it hardens but it just doesn't seem right.


It does have it's drawbacks though. It's toxic for one thing! I have to wear gloves to apply it and a dust mask to sand it. You can actually have an allergic reaction if it gets on your skin. I may even get a jumpsuit to keep it off of me. It can get really hot...... I mean really hot. The chemical reaction between the resin and the hardener creates a lot of heat. After mixing it up it's best to spread it out in a paint tray or some such container. That helps to dissipate the heat. To give you an idea of how hot it gets, I ordered these pumps that dispense an ounce of liquid every time you press the plunger all the way down. One ounce of hardener for every two ounces of resin. I primed the pumps by holding a plastic cup under the spigot and depressing the plunger until liquid came out. I only let a few drops of the resin and harder fall into the cup and I set it down to start mixing up some glue. Well when I went back to throw the cup away after gluing up the keel, the bottom of the cup was melted. Jeeezz! Imagine if you dropped a big glob of it on your arm. I don't mix up more than a few ounces at a time when I am gluing. The "pot life" is about half an hour before it starts to harden up and become useless. Nothing like a little pressure on a novice boat builder. It's also extremely sticky. I have to be careful about how I pick stuff up when I am using it. I glued my rubber glove to my power drill the other day. It's also very hard to get off of the furniture if you have a little on you when you sit down. Don't ask me how I know. Oh yea, it costs $100 for a gallon of resin and a half gallon of hardener. That's almost as much as a week's worth of booze.... Almost.


It's kind of intimidating to get started with it. But I was determined not to let it beat me. So I had Debbie spread it while I fit the pieces together and screwed them up. Hey, the pieces were too heavy for her and she couldn't put enough push behind the drill. At least I mixed it up for her. And she offered to help. I didn't want to disappoint her. She had her heart set on helping.


All of the joints on the boat are both glued and screwed - that's just fun to say. I laugh every time I say it, try it, I bet you laugh too. The first pieces I put together were the keel. I don't have any pictures of us glueing up the keel because...well....we were busy gluing up the keel. Here is what it looked like after it was glued and the screwed.  Hehe.


Keel Screwed and Glued


I waited to do the gluing until in the early evening. One of the reasons for doing the boat now is because it's supposed to start getting cooler. Yea right! It's been like 95 friggin degrees and 60% humidity here in north Florida all September. I guess that's a little cooler than August when we were over 100 degrees but it is still too hot to epoxy. How Meteorologists get away with being wrong half the time and still keep their jobs I'll never know.......but I digress. It'll set up over night but it takes a good week or two to fully cure. I made a little stand for it from some scrap wood.


Keel


Looks like a big lizard doesn't it? The bottom of the hull goes on it's "back", the deck is above that starting at the top of the "head" parallel to the hull bottom and the bowsprit will stick out on top of it's "nose". I'll steer the boat from back there on it's "tail".


So, I put my first parts of the boat together. Just like that, I'm a boat builder!

Tuesday, September 27, 2011

The First Cut Is The Deepest....

I started this project a couple of weeks ago so I'll try to get you caught up over the next couple of days.


The first thing I had to figure out is where to build the darn thing. I have no garage and Deb would not let me build it in the house so hey, this is Florida, I can build it outside. It wouldn't be good though to build it in an uncovered area or I'd end up with a lot of extra yard trash and other stuff incorporated into my boat. Also, the UV and heat would cook everything before I have a chance to paint. I've claimed an area on the side of the house that's about 11 X 25, right near our double gate, garbage can, AC unit and satellite dish. Kinda cozey. Deb had to move some plants because she knew I would end up trouncing them. I ordered a 10 X 20 canopy that fits perfectly between the house and fence. With the gates closed it's like a well ventilated three sided garage. I'm in business.


I ordered some epoxy from a place in Vero Beach but I was eager to get started. While I was waiting I decided to start cutting a few of the smaller pieces. I started by cutting out the rough shapes for the rudder assembly.

Tiller
I cut a tiller from a 2X4. It doesn't look like much here but I'll shape it and sand it into a comfortable handle to steer the boat with.

Sides for rudder box
Then I cut out the sides for the rudder box from 3/8 ply wood. I lofted - that's boat buildingeze for drawing the outline of the piece I am making on the wood - one side and cut it out then used that as the template for the other side. These two pieces will end up glued and screwed together with the tiller sandwiched at the top and the rudder sandwiched in the bottom. Speaking of the rudder.

Rudder
This I cut from a 1 X 12. I'll shape the sides into what I hope will be a good shape. The long right edge will be tapered to a point and the leading left edge will just be rounded off. It'll end up about the shape of an airplane wing. This should give me good control of the boat.


Life is good. I got over my "first cut fever". That's an ailment that first time boat builders are afflicted with. It's like jumping in the ocean. It's icey cold to begin with and you don't want to get in but after splashing around for five minutes you don't even notice it. Once you get started cutting it's no big deal. 


I also made some dead eyes.

Dead Eyes

These are entirely ornamental. The holes are rounded with a file and you put metal strap around them. You string some line between two of them and then attach them to the bottom of the shrouds. They are supposed to look like the wooden blocks they used in the days of the sailing ships. I'm not sure that I want to incorporate these into the wire that holds my mast up though. If I use them I will most likely just attach them on the side of the wire.  I think it'll look kind of piratey. ARRRRGGGGGG!!


So after the epoxy arrived - and I got paid - I bought some wood to make the keel. It's made by laminating several pieces of 1 X 12's. It's two boards wide which is a total of 1 1/2 inches and about 14 feet long. I don't know how the lumber industry gets away with saying that a 3/4" thick board is 1". Must be men doing it because we have been known to "fudge" a little when it comes to measuring inches. But I digress. Why not use 2 by stock you ask? Laminating two thicknesses together is stronger than one solid board. It also allows you to orient the woodgrain opposing each other to cut down on warping. You've seen those decks after being in the sun for a couple of years that curl up on the edges? It would not be good for your keel to do that.

Keel Pieces
I made one side and used that as a template to cut the other side. You can see in the picture that the pieces are cut so that the joints don't line up with each other. This strengthens the keel when the two halves are attached together. Next came the screws. Lots and lots of screws.

Keel Screws
The screws are spaced so that they are all within five inches of each other. They are the same kind you use on a deck. They really do a good job of grabbing the wood and they are rust resistant. I'll end up counter sinking them and covering them over with thickened epoxy. You can see in the picture that I drew lines one inch in from all the edges. Then I spaced the center ones. The screws are only started into the wood. This way after I glue the two sides together I can come along with a drill and drive all the screws in before the glue sets up too much. I'll end up using over 1200 screws. For a boat, it sure has a lot of holes in it.


Next time I'll talk about the sticky stuff. I've developed a love/hate relationship with epoxy.

Sunday, September 25, 2011

The Journey Begins

Stevenson Projects Super Skipjack
Greetings!


This is my blog about the sailboat I am building. It's a 14 foot Super Skipjack. The Skipjack was a fishing boat used on the Chesapeake for harvesting oysters. They were popular beginning in the late 1800's and into the first part of the 1900's because of their shallow draft and it is the state boat of Maryland. Mine is a smaller version adequate for day sailing and learning how to sail.


I purchased the plans from Stevenson Projects. I chose this boat because I like the "salty" look, the fact that I can build it using regular power tools and readily available materials and because the plans are designed with the first-time boat builder in mind. The plans are in booklet format with step by step instructions and a three and a half hour video showing the designer building a 16 foot version with a small cabin. It's gaff rigged with a self tending jib. I figured that since I will be single handling most of the time that  a self tending jib is a good feature. Of course, after I build it I'll have to learn how to sail.


It's made out of ply-wood, screws and a lot of epoxy. I plan to fiberglass it and put a couple of coats of paint on it to help it slide through the water easily. It weighs less than 200 pounds and is supposed to be quite sporty since it uses the same size rig as the larger boat. It has a full length keel but no center board. It was originally designed with a center board but the designer found out that it sails fine without it. It doesn't point quite as close to the wind as some other boats but it is supposed to handle just fine. I'm not looking to race it. I just want to get out on the water. The waters around here are very shallow so I need something that doesn't have four feet of boat under the waterline.


Well that's the plan. We'll have to see how things go. I'll be taking my time with it but hope to have it ready to go sometime in the spring. I'll try to take a lot of pictures and post here regularly.